XWisp is a PC application for use with Wisp628, WISP and WLoader.
Downloads:
| Windows installation: XWisp is available as installation file for Windows. This is the recommende way to use XWisp on Windows. |
| Source installation: an alternate installation file is available for Windows an which contains XWisp as Python source. This allows you to modify XWisp. Before using this version you must install a Python interpreter and the Python Win32 Extensions. This installation is recommended only if you want to use your own Python interpreter and/or want to modify the XWisp source. |
| For Linux and other POSIX OSses for which a Python interpreter is available XWisp is available as a tarball containing only the Python sources. |
XWisp can be used either
| as command line tool |
| to download .hex files by double-clicking on the file (Windows only, editing of some configuration files might be needed) |
| to build your own customised window interface (Windows and Linux/X) |
XWisp can be used as command line tool from a command prompt (Windows: a DOS box). It supports the same commands as the wisp tool, except
| xwisp.py must be used instead of wisp |
| for Wisp628 1.03 and higher a baudrate argument to the port command selects the communication speed to use, which can (only) be 9600, 19200, 38400, 57600 or 115200. |
| the target command is extended to all targets supported by Wisp628. |
| the burn and id commands (for the WISP programmer when more than one programmer is used on the serial line) are not supported |
| the calibrate and vcc commands (for the WISP programmer for verification at different voltage levels) are not supported |
| the log, hex, protect and test commands are not (yet) supported |
| the TProg commands can be used to specify the programming delay. This is aonly for those who want to speed up programming to the utmost. Check the programming specifications for the target you use for the typical and maximum programming delay. The default is 0, which lets the programmer select an appropriate value. The delay is specified as a decimal number 0..255, the unit is 100 us. |
The windows installation associates the XWisp program with the .hex and .xwisp file extensions. For other platforms a line like:
#!/usr/local/xwisp/xwisp.py
On windows, double-clicking an .xwisp file opens a window, which is filled by interpreting the .xwisp file. On other platforms a .xwisp file can be made executable (and insert the #! line), or (both windows and other platforms) a file can be started explicitly by a command like
xwisp file.xwisp
Each line in the .xwisp file is interpreted as a command. The available commands are:
| button [ at coordinates ] [ text text ] xwisp command(s) | |
| The button command puts a button in the window at the indicated coordinates. The button shows the indicated text. When the button is clicked the indicated XWisp command line command(s) will be executed, prefixed by the xwisp_defaults as explained below. | |
| close_window | |
| The close_window command closes the 'activity' window. This will of course only happen if no previous command caused an error. | |
| label [ at coordinates ] [ text text ] | |
| The label command puts the indicated text in the window at the indicated coordinates. | |
| macro name expansion | |
| The macro command defines name as a shorthand for the indicated expansion. This is usefull to define things like the serial port that must be used at one place. | |
| name text | |
| The name command cause the indicated text to be used as the window's title. | |
| nextrow | |
| The nextrow commands cause a next window item (button or text) that does not specify a location to appear in the first column of the next row (instead of immediately to the right of the last window item). | |
The coordinates must be expressed with a letter for the row and a digit for the column, a1 being the upper-left corner. When 'at coordinates' is omitted the screen item (button or label) is by default put to the right of the previous one, but a nextrow command cause it to be put one row below the previous screen item, in the first column.
A text must be a single word, but underscores in the text are displayed as spaces.
Before the .xwisp file itself is read, the global xwisp.ini file (the same directory as the xwisp.py file, default is "C:\Program Files\XWisp") and the local xwisp.ini file (in the same directory as the .xwisp or .hex file) are read an processed.
When an XWisp command is executed the macro xwisp_defaults is put in front of the command line. By default this macro expands to an empty string, but it can be defined in the global or local xwisp.ini file, or even in the .xwisp file itself.
When a .hex file is double-clicked xwisp
processes
button text go_hex_file xwisp go hex_file
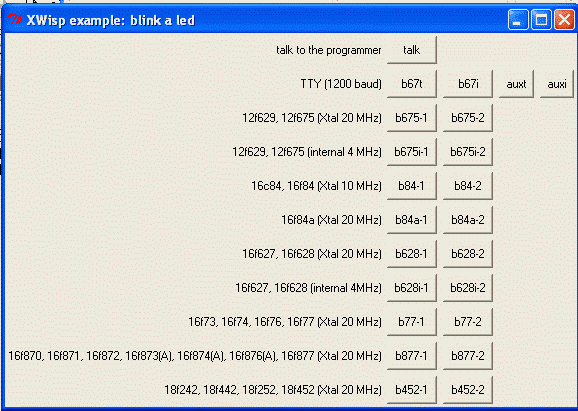
The installation provides an example subdirectory with an example.xwisp file and a bunch of .hex files that blink a LED at 1 or 2 Hz on pin a0 of various targets. See the wisp628 page for more information, target circuits, etc. The screenshot below shows the window created by the example.xwisp file (click to enlarge).
When a target chip is specified XWisp will try to verify that a chip of the specified type is present by reading the chip's ID. When it does not find the specified chip the program will abort with an error message.
When no target chip is specified XWisp will try to determine which chip is present by reading the chip's ID. This is done using two different algorithms, one for the 18F chips and one for the other chips. Reading the ID from a chip using the read algorithm for a different type of chip could have unintented effects, like erasing the chip. No such effects have actually been observed, but when the content of the chip must be read it is advised to specify the target chip explicitly instead of relying on the autodetect.
The older 16c84 and 16f84 (without 'a') chips do not have an ID, so the program just checks that no valid ID is read and then assumes that the specified chip is indeed present.
Download and install XWisp.
| Download and install Python (version 2.1 or higher) from www.python.org. |
| Download and install the Python Win32 Extensions from http://sourceforge.net/projects/pywin32/. |
| Download and install xwisp_src_setup. |
| In the XWisp directory (by default C:\Program Files\XWisp) double-click on register.py. |
On NT-derived windows versions you can insert the following line in
your startup batch file, to make it possible to type just xwisp (without .py):
set PATHEXT=%PATHEXT%;.py
Or more permanently:
| Bring up the System control panel and select the "Environment" tab. |
| Is the PATHEXT variable in the "System Variables" list? |
| Yes: Add the file extensions above to the end of the value, separated by semicolons |
| No: Click on one of the System Variables, then type "PATHEXT" into the Variable text-field and ".com;.exe;.bat;.cmd;.tcl;.tsh;.tk" into the Value text-field. |
| Press the Set button to save the changes to the environment. |
| Restart any consoles to see the changes to the environment. |
You will have to create yourself a suitable Python environment, either using a 'classic' Python or using Jython running on Java. Luckily most modern Linuxes come with Python, but you might have to enable it during installation.
Download the XWisp sources (.tar.gz) and unzip/untar them to a suitable location, like (on Linux) /usr/local/xwisp.
For some reason opening the tarball on Windows by simply clicking on the link in my browser produces the message "Error reading header after processing 0 entries". First saving the link and then opening the file does work OK.
When your Python executable is not in the default location modify the first line of XWisp.py accordingly.
| Exceptions (like a serial port which is not available) are handled badly or not at all. |
| Problems are reported (only) in the DOS window that hides beneath the windows interface. |
| When the result window is resized the actual output frame is not adjusted. |
| As yet there is no Linux/Unix support, but I have reports from customers using XWisp on Linux succesfully. You might need to convert XWisp.py to Unix line endings first (use dos2unix). |
| The communication with the programmer is slower than with wisp.exe. |
The installer sometimes fails to associate .hex and .xwisp with the xwisp.py program
(when an association already exists?). In that case
an (new?) association must be created manually:
|
| On my main PC (2GHz, win2k) using the on-board serial port does not work reliably. I could not reproduce this problem on other PCs. An USB->serial converter worked perfectly. |
| For 12Fxxx targets: the bandgap and oscillator calibration is not automatically preserved. |
| Some programs (the explorer!) can create file associations that override the ones created by XWisp. You will have to remove such associations from the registry by hand. Look under HKEY_CURRENT_USER/Software/Classes/Applications and HKEY_CURRENT_USER/Software/Microsoft/Winodws/CurrentVersion/Explorer/ComDlg32/FileExts. |
| When is XWisp is run on Jython/Java don't rely on the default port, specify a port explicitly. |
XWisp uses:
| Python: a cross-platform scripting/programming language |
| the Python Win32 Extensions |
| pySerial cross-platform serial port interface |
| py2exe to create a standalone windows executable from the python sources |
| Setup2GO to create the windows installers |
| 10-JUL-2012 | 1.41 | XMODEM downloads for Raspberry Pi bare-metal added |
| 11-MAY-2012 | 1.40 | bugfix : 18F1320 code size set to 8 Kb |
| 10-DEC-2010 | 1.39 | bugfix |
| 11-NOV-2010 | 1.38 | 16F1827 (and related chips), 16F1947 (and related chips) added |
| 13-OCT-2010 | 1.37 | 18F1230, 18F1330 added (requires Wisp648 1.30) |
| 07-JAN-2010 | 1.35 | configuration fuses masks corrected for 18F4685 and relatives |
| 15-JUN-2009 | 1.34 | some minor corrections |
| 05-MAR-2009 | 1.33 | GUI is now available (but still with a black dummy window in the background) |
| 01-FEB-2009 | 1.32 | read/write ID locations for 12-bitv cores corrected bug in handling 14-bit core chips without ID (16x83, 16x84) corrected |
| 18-JAN-2009 | 1.31 | support for 12F609, 12F615, 16F610, 16F616 |
| 01-JUN-2008 | 1.30 |
WAIT END and WAIT ERR added (for use from a GUI)
more targets supported |
| 23-OCT-2007 | 1.20 | windows non-python installation added |
| 19-NOV-2002 | 1.05 |
some bugs corrected
with latest Wisp628 firmware: faster 16F630/676 added TPROG and CLOSE_WINDOW commands |
| 19-NOV-2002 | 1.05 |
use of higher baudrates (Wisp628 1.03)
PASS repaired higher serial ports (COM9..) can now be used on Windows use jump on 14-bit cores (Wisp628 1.03) |
| 19-OCT-2002 | 1.04 |
12F629 and 12F675 swap corrected
DUMP added to on-line help CLOSE, CLEAR WAIT corrected RTS, DTR take immediate effect |
| 30-SEP-2002 | 1.03 | XWisp now runs on Jython/Java, but it is *slow*. It should also run on posix platforms (Linux!), but this has not been tested. |
| 16-SEP-2002 | 1.02 |
MACRO bug corrected
16F877A added chip detection changed to accomodate 18Fxx8 |
| 10-SEP-2002 | 1.01 |
faster communication with new Wisp628 firmware
time command implemented write command corrected |
| 4-SEP-2002 | 1.00 | first version |